A Simple Recipe for Great Bread. In Painful Detail.
Overview
For a long time, I’ve obsessed over making a simple loaf of bread that keeps effort to a minimum, gives some flexibility on when to start baking, and still makes someone go “whoa” when it comes out the oven. I figured the procedure I came up with would be a good first entry for this blog. Baking bread is a ton of fun, and I hope you give it a go.
There’s a lot of detail below. I hope it doesn’t bother or deter you. It’s only there in the hopes of helping you avoid the mistakes and time-wasters with which I wrestled.
To get to our loaf of bread, our most important allies are time and temperature. Other things you’ll need:
- Ingredients
- White flour
- Whole wheat flour
- Salt
- Yeast
- Water
- Tools
- Digital kitchen scale
- Dough scraper (optional)
- A lint-free dish towel
- Some kind of strainer or basket, about 6 inches wide (available at a dollar store)
- A heavy pot with a lid, preferably enameled cast iron
- Parchment paper
- Some light, flat, portable surface, like a cookie sheet
Here are our steps, from a high level point of view, to get to this loaf:
- Lightly mix the dough ingredients, measuring them by weight, the night before you want your bread to come out of the oven. After a brief rest for your dough, cover it and put it in the fridge.
- Leave the dough in the fridge for 12-24 hours, checking on it once or twice to fold it over itself. Besides that, you’re not going to take the dough out of the fridge until the next step.
- The next day, about an hour, maybe an hour and a half, before you want to start baking, take the dough out of the fridge, shape it, and let it rest and rise at room temperature until it’s time to put it in the oven.
- About 30 minutes before you want to start baking, take your heavy pot, lid and all, and put it in the oven to preheat. Once the 30 minute preheat is up, put your dough inside the pot in the oven, cover the dough, and let it bake.
- After 30 minutes of baking the dough covered, uncover it and give the dough anywhere from 20-30 minutes more bake time uncovered. Then you’ll take it out, let it rest briefly, and chow down.
Here we go!

Step 1: Mixing Your Dough
Total Time: 5 minutes of effort by you, plus 30 minutes for the dough to rest
The first thing I recommend doing, before all else, is buying a simple digital kitchen scale, if you don’t have one already. I didn’t know this when I first started out, but professional bread bakers measure their ingredients by weight to produce consistent results. What’s the reason for this? If you scoop a cup of flour out of a flour bag, you can push that flour down to something less than a cup. So did you actually scoop a cup of flour, or something less? The point is, the density of flour can be inconsistent, so if you measure it by volume (like by “cups”), you really don’t know how much you’re adding. Measuring by weight takes that mystery away.
To measure your ingredients by weight, figure out how much flour you want to use, and then base your other ingredients off some percentage of that flour weight. For our ingredients (white flour, whole wheat flour, salt, yeast, and water), here are the ratios I typically use:
- The total flour weight is “100%.”
- 10% of that is whole wheat flour.
- 90% is of that white flour.
- Salt: 2% of total flour weight.
- Yeast: 1% of total flour weight.
- Water: 75% of total flour weight (this % is the “hydration level”).
A dough with a total flour weight of 400g will yield a loaf that’s about 7 inches in diameter and about 3.5 inches high. So assuming you start with 400g total flour weight, your ingredient breakdown is:
- 40g whole wheat flour
- 360g whit flour
- 8g salt
- 4g yeast
- 300g water
I’ve played around with different hydration levels in the past, but I’ve found that 75% works well for a long, cold ferment like we have here.
To mix your ingredients, use your scale to measure out the white flour (360g), whole wheat flour (40g), and salt (8g) in a bowl. Whisk this dry mix to incorporate. In a separate bowl, measure out your yeast (4g) and water (300g), and whisk this mixture for a few seconds until the yeast dissolves. (Some bakers advocate that you use filtered or bottled water, rather than tap, because the chlorination in tap water could inhibit the yeast. I’ve use filtered water here.)
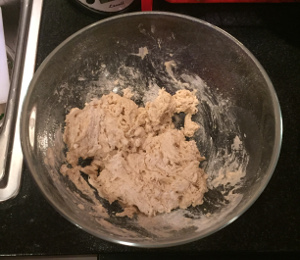
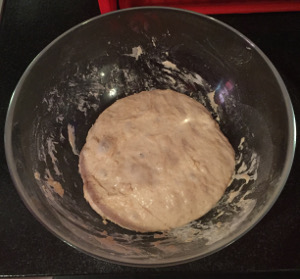
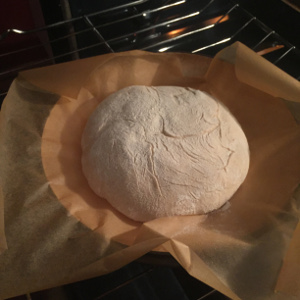
Pour the wet ingredients over the dry ones, and mix with a utensil or your hands. If you use your hands, it helps to wet them slightly to prevent the flour from sticking to your fingers. Mix just until the ingredients are incorporated. You’ll know you’ve achieved this when the dough appears “shaggy,” like below.
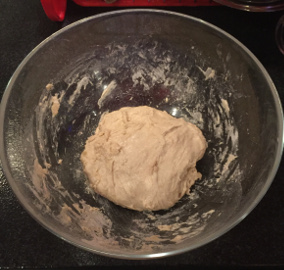
After mixing the ingredients, let the dough sit there for 30 minutes. This rest gives the flour a chance to absorb the water you’ve added and to swell a bit. After, if any bits of dry flour remain, you can put them in the center of the dough and fold the dough over itself into the shape of a ball as best you can. Cover your mixing bowl with plastic wrap or a lid, put it in the fridge, and congratulate yourself on getting things rolling.

Step 2: Sit Back and Let It Ride, with a Little Bit of Love Once in a While
Total Time: 2 minutes of effort by you, plus 12-24 hours of wait time before Step 3
After you’ve mixed the dough, the magic of fermentation begins, brought to you by the yeast that you’ve added and by other beneficial microorganisms that might be hanging out in your dough. They happily chow down on the wet flour you’ve fed them, adding flavor, loft, and structure to the loaf that will ultimately come out of your oven. Yeast tends to like warm temperatures, so it seems a bit odd to put your dough in the refrigerator. But, I’ve found that if you leave your dough out at room temperature for a while with this amount of yeast, you might come back to find your dough has become a soupy, boozy mess, because the yeast has worked too well. Putting the dough in the fridge, however, still allows the yeast to do its work, albeit at a slower pace, which buys you some flexibility in your choice of when to start baking. For example, some of my doughs have gone 36 hours in the fridge with no problem. And some bakers even argue that better flavors develop if the dough ferments at cold temperatures for a longer period of time.
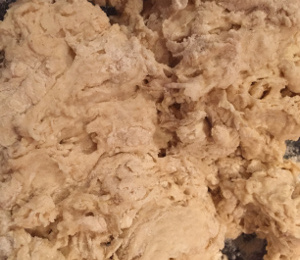
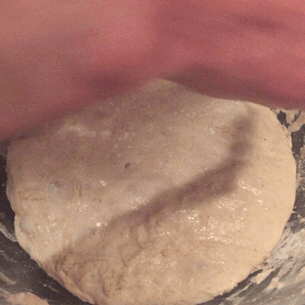
Here’s what the dough might look like after 12 hours in the fridge. There’s a bubbly surface, which is a sign of the yeast’s handiwork.
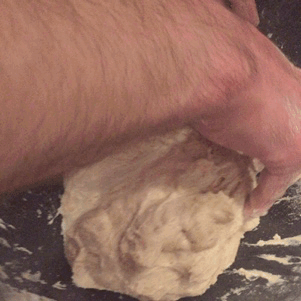
All you have to do for this step of the process is give the dough a “turn,” maybe once or twice, over the course of the 12-24 hours that it ferments in the fridge. A turn takes 10 seconds and is a fancy way for saying fold the dough over itself. If you pull your cold dough out of the fridge and imagine it as a clock, what you do is grab the dough at 12:00, pull it over the face of the clock, and push your fistful into 6:00, like so:
Do that three more times around the dough to complete one “turn,” taking 3:00 dough to 9:00, then 6:00 dough to 12:00, and then 9:00 dough to 3:00. You can rotate the bowl and move quickly, but all it takes is one turn. No need to go on to infinity here….
It helps to have slightly wet hands so the dough doesn’t stick to you. Feel free to re-shape your dough into a ball, and then stick it back in the fridge. You can revisit your dough later and do more turns if you want, so long as you’re not toughening up your dough with all the activity. The loaf shown throughout this page only went through one turn during its 24 hours in the fridge.

Step 3: Shape the Dough, Let It Rise, Preheat Oven and Pot, and Get Dough in the Oven
Total Time: 15 minutes of effort by you, plus 60 to 90 minutes for dough to rise and oven to preheat
Shaping the Dough for Rising
Once your dough has fermented in the fridge for 12-24 hours, it’s time to prep things for baking. The first thing to do is shape your dough and let it rise outside of the fridge. Assuming your kitchen’s ambient temperature is about 70-80 degrees, you’ll want to let your dough rise for an hour, maybe an hour and a half (the dough may need more time if the ambient temperature is cooler). Your baking time will take about an hour. So working backwards, you should begin this step about 2 to 2.5 hours before you’d like to see the loaf come out the oven.
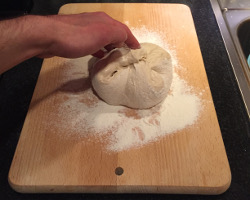
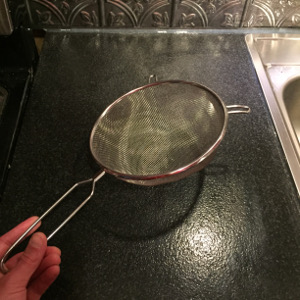
To shape the loaf, take it out of the refrigerator and ease it out of its container on to a generously floured surface (a small strainer can help with the flouring). The shape of our loaf will be a circle. To accomplish this, we’re going to do a “turn” of the dough, but instead of bringing each fistful of dough to the opposite end of the dough, we’re going to bring it to the middle. So imagining the dough as a clock, grab “12:00” and bring it to the middle, then do the same with 3:00, 6:00, and 9:00. After, flip your dough gently so the “seams” created by the turn are on the bottom.
Below, you’ll see (1) a quarter “turn” of dough to center, (2) a full turn to center completed, with me holding things in place, and (3) the result when dough flipped.
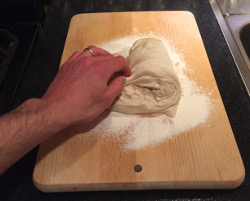
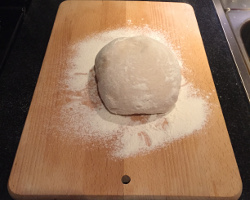
The side of the dough you see now should look pretty smooth and round, and the dough is probably 4-5 inches in diameter. If you’re not happy with the shape, you can use a dough scraper to tuck the edges under further. This will also help with the dough’s structure.
The dough will have a better shape coming out of the oven if it is rises within a shaping mold of some sort. For this reason, I’d recommend letting the dough rise in a 5-6 inch strainer or colander. The one shown below was purchased at a dollar store for a few bucks, and it fits nicely into another bowl I have.
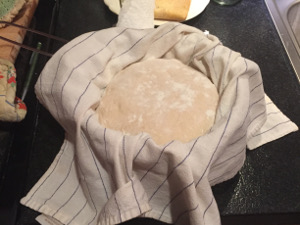
Take a lint-free (non-fuzzy) dish towel, line the strainer with the dish towel, and dust the dish towel heavily with flour. Rub the flour into the towel a bit. Now lift your dough up and place it, smooth side up, in the strainer. Put the strainer in a bowl.
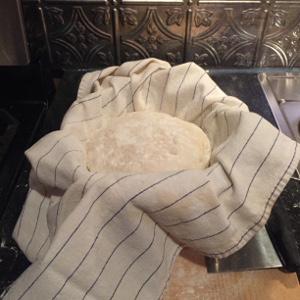
Cover your dough with the flaps of the towel and set the dough aside somewhere that’s about 70-80 degrees. If you feel your room is a little cool, resting the dough nearby a pre-heating oven will help (NOT on top of the oven – that’s too hot). Or you can put the dough on a high bookshelf (where the air will be warmer, because heat rises). Your dough should rest undisturbed for an hour to an hour and a half.
Pre-Heat Oven and Pot, 30 Minutes Before Baking Time
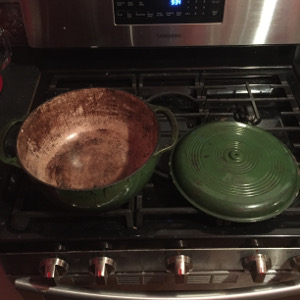
Thirty minutes before you want to put your dough in the oven, get out your heavy pot and head to the oven. The key to making a really good loaf at home is to bake it in a heavy, pre-heated, covered pot within the oven. The nice crispy crust people like on professional loaves comes (ironically?) from maintaining a moist oven during the initial stages of baking. The heavy, covered pot acts like a moist mini-oven within the actual oven, sealing the loaf in with its own moisture as it starts to bake. Hence, we have to preheat our oven (typically at 425 degrees) with a heavy, lidded pot inside. The pot I use is a green Lodge enameled cast iron pot, 10.5 inches in diameter and about 5 inches deep.
The problem I’ve found with the books that recommend baking bread in a pot is that these books casually mandate putting your delicate dough in a deep, scalding-hot vessel without mentioning how to do this gently and not burn your fingers off. Here’s the method I came up with to deal with this. It’s a bit odd, but hopefully it will all make sense after giving this entire section a complete read.
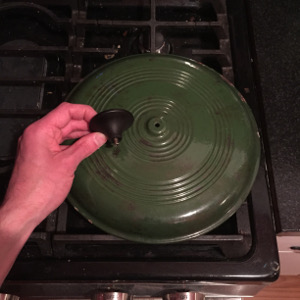
Most heavy, enameled cast iron pots have a lid handle you can take off by unscrewing it. Unscrew the lid handle and put the handle (and its screw) in a safe drawer.
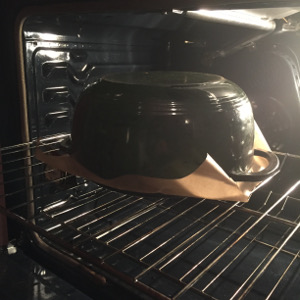
Thirty (30) minutes before you are ready to put your loaf in the oven, put the lid of you pot upside down in your oven on the middle rack. Put the body of the actual pot somewhere inside the oven too.
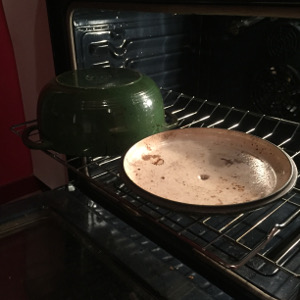
Important for later: make sure there is no rack above where the pot sits, otherwise there’s a higher chance of burning yourself when dealing with the dough later. Close the oven up and set the temperature for baking. I’ve found baking at 425 degrees gets my loaves to where I like them to be, but you can adjust within the 400-475 range depending on how you feel about your oven. Again, preheat your oven with the pot inside for at least 30 minutes prior to baking your dough.
Getting the Dough in the Pot Without Burning Your Fingers to Kingdom Come
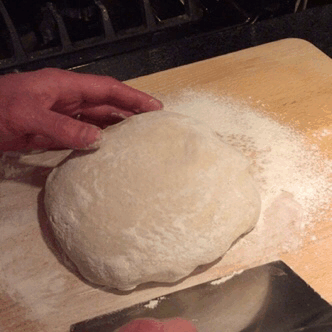
After your dough has risen for 60 to 90 minutes, it’s time to get it in the oven. Don’t worry if your dough still has a bit of chill on it from the fridge; that’s totally fine. Here’s what it may look like:
Cut a large square or rectangle of parchment paper, bigger than the lid of your pot. Unfurl the edges of the dish towel from the top of your dough, still leaving the dough in the strainer. Put the parchment paper directly on top your dough. Now place a cookie sheet upside down on top of the parchment paper.
Fearlessly, using one hand to hold the cookie sheet in place and one hand to steady the strainer, lift the strainer out of the bowl and flip the whole thing in a controlled, gentle manner so the cookie sheet is on the bottom, followed by the parchment paper, the dough, the towel, and the strainer. Remove the strainer and the towel. (If the towel sticks to the dough a bit, go slow with the removal and don’t sweat it; make a note to add more flour to the towel next time.)
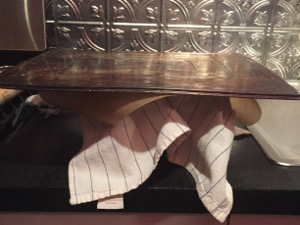
What good did all those steps do? With the “arrangement” in your hands of cookie sheet, parchment paper, and dough, what you now have is the ability to carry your dough to the oven on the cookie sheet, and then gently slide it on to the upside down lid using the parchment paper. When it’s time to bake, bring the cookie sheet nearby the oven. Open the oven door, slide out the rack with the pot lid, and put the pot’s body somewhere stable, like on top of the oven. Bring the cookie sheet close to the upside down lid, grab a side of the parchment paper, and slide the parchment paper on to the upside down lid until the dough is about in the middle.
Now cover your dough with the pot’s body so it fits tightly on top of the lid.
Close the oven door, and kiss your healthy fingers in gratitude for their existence.
“But wait,” you say, “some things don’t make sense here. First, remember how we shaped our dough? Our seams from folding are now on the top of our loaf thanks to your fandangled method. What about the beautiful smooth side of the dough I fell in love with earlier? Second, your hands are looking a bit red there, buddy. How can you tell me with a straight face that my fingers are not in mortal danger?”
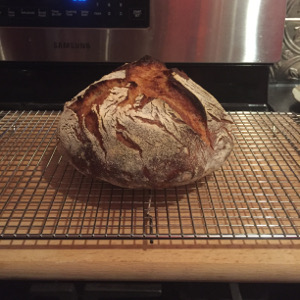
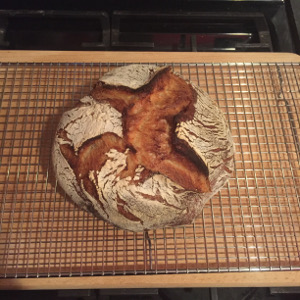
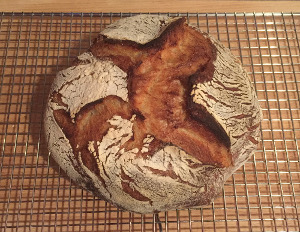
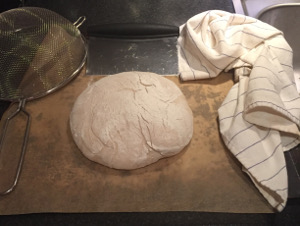
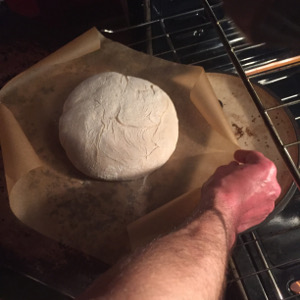
Rest assured, there are answers to these questions. On baking the loaf seam-side up: the whole time that the dough was rising outside the fridge, it was rising upside down, its ultimate “roundness” being aided by the roundness of the strainer basket. When the seams are on the top side of the baking dough, they give the loaf beautiful cracks and “ears” as steam escapes during baking (take a look at the pictures below). If you want a more formal design for your loaf, you can always bake the loaf smooth-side up and use a sharp knife to make few purposeful, even slices for steam to escape. On the rosy hands: don’t worry, they are not burning off. My hands just do this weird thing of noticeably changing color in extreme temperatures – purplish in the cold, reddish in the heat (such as the open oven door). This is not quite the X-Men power I had hoped for as a kid, but it is what it is.

Step 4: Bake Your Dough
Total Time: 5 minutes of effort by you, 50-60 minutes baking time
You’ve done great so far. The hardest parts are over, and you’re just about at the end. Bake your loaf in the oven, covered, at 425 degrees for 30 minutes. After 30 minutes, remove the body of the pot to uncover your dough, and put the body of the pot some place safe where no one will accidentally touch it while it’s hot (you can leave it on another rack the oven if there’s room). Here’s what the loaf might look like after this initial 30 minute bake:
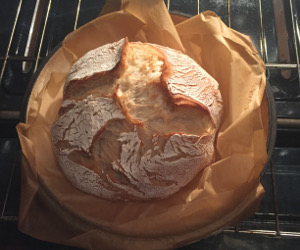
Continue to bake the loaf uncovered for 20-30 minutes at 425 degrees. The baking time for this last part will depend on how well-done you like your loaf. I like 20 minutes to get to my preferred level of crust-darkness. Trust your nose. If things start to smell like burnt toast, you may want to check on your loaf. If you find the bottom is browning too fast, you can use the parchment paper to slide the bread off the lid (whose intense heat can cause charring) and lower the temperature in the oven a bit.
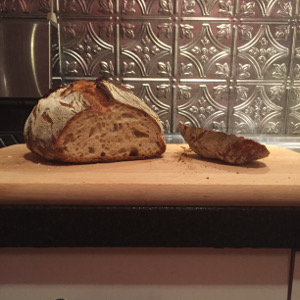
Once you’re happy with the loaf’s “doneness,” take the loaf out of the oven. You can double check if your loaf is done by tapping the bottom with your knuckles; if the tapping makes a hollow sound, you’re good to go. Let the loaf cool for 10-15 minutes. (It’s fun to listen to the loaf as it cools, crackling and popping as steam continues to escape.) Then go to town on it. Some bakers recommend letting the loaf rest for at least an hour after it comes out of the oven. I adhered to this until one day, right after a loaf came out of the oven, some hungry friends revolted at the notion of such a long rest. We chowed down 10 minutes after the loaf came out, and I’ve never looked back since. It was too good.
Below are pictures of how the loaf featured on this page came out. Thanks for hanging in there through all of these instructions. I know they are a lot to go through for something advertised as a “minimal effort” loaf, but I hoped the details would reduce confusion and keep things easy for you. Feel free to experiment and tweak, and above all else, have fun and share your creations with people you care about.